If you don't usually review dump files to troubleshoot problems, they are probably wasting valuable space – here's how to delete them on Windows 10.
On Windows 10, when a critical error occurs (such as Blue Screen of Death (BSoD)), the system creates memory dump files (also known as "crash dumps"). These files contain a copy of the system memory at the moment of the crash, which can help to diagnose and determine the reason for the problem.
Although these system error dump files can come in handy in many situations, unless you are a developer or planning to send the files to Microsoft support or software engineer for analysis, they will only be wasting space on the hard drive since they can be as large as the total size of the physical memory, and they can grow larger over time.
If you are running out of space on your computer, or you do not need these files because the problem has been resolved, Windows 10 includes at least three methods to safely delete them using the Settings app, Disk Cleanup, and Command Prompt.
In this Windows 10 guide, we will walk you through the steps to find and delete system error dump files wasting space on your device.
- How to delete system error dump files with Settings
- How to delete system error dump files with Disk Cleanup
- How to delete system error dump files with Command Prompt
How to delete system error dump files with Settings
To remove the system error dump files on Windows 10, use these steps:
- Open Settings.
- Click on System.
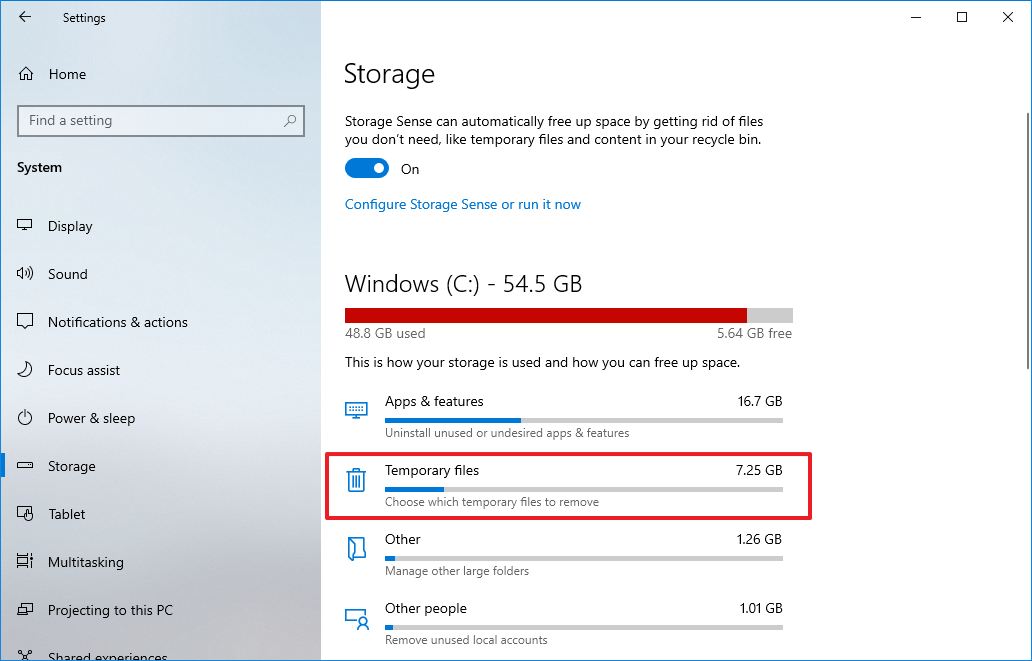
- Click on Storage.
-
Under the main drive section, click the Temporary files option.
-
Check the System error memory dump files option.
-
(Optional) Check the System error minidump files option.
Quick note: The memory dump files contain everything available in memory and are usually as large as the memory size. In contrast, the minidump files are only several megabytes in size, and they contain only basic information about the crash.
- Clear the other selected items.
- Click the Remove files button.
Once you complete the steps, the files will be deleted from your computer, making additional space for more important files.
How to delete system error dump files with Disk Cleanup
To delete the system dump files with Disk Cleanup, use these steps:
- Open Start.
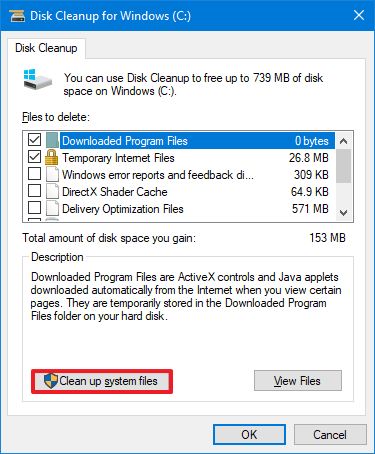
- Search for Disk Cleanup and click the top result to open the app.
-
Click the Clean up system files button.
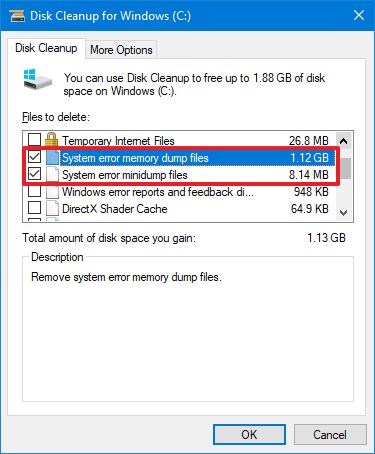
- Check the System error memory dump files option.
-
(Optional) Check the System error minidump files option.
- Click the OK button.
After you complete the steps, the memory dump and minidump files will be removed from your device.
How to delete system error dump files with Command Prompt
To delete the error dump files with Command Prompt, use these steps:
- Open Start.
- Search for Command Prompt, right-click the top result, and select the Run as administrator option.
-
Type the following command to delete the system error memory dump files and press Enter:
del /f /s /q %systemroot%\memory.dmp -
(Optional) Type the following command to delete the system error minidump files and press Enter:
del /f /s /q %systemroot%\Minidump\*.*
Once you complete the steps, the commands will delete the "memory.dmp" and all the error dump files inside the Minidump system folder.
If the device has not run into a problem, or has recently performed some storage maintenance, there is a good chance that there are no dump files to delete. If this is the case, you won't find the options in the Settings or Disk Cleanup, and nothing will be available in the Windows or Minidump folders.
More Windows 10 resources
For more helpful articles, coverage, and answers to common questions about Windows 10, visit the following resources:


No comments: